|
|
||
|---|---|---|
| .. | ||
| diagrams | ||
| meetings | ||
| scrap | ||
| end-user.md | ||
| readme.md | ||
LearningPulse software surface level documentation
Abstract
Learning Pulse is an innovative learning platform that blends the strength of Redmenta and Google Classroom to create a collaborative educational environment. The objective is to provide a comprehensive feature package, aiming to incorporate as many elements as possible while maintaining focus on stability. The feature list includes interactive quizzes, dedicated classrooms and assignments, designated study and file-sharing drives for students, and administrator panels.
Feature set
Classroom
Upon entering the platform this is the first thing students (end-users) will see. A list of classes where the student is enrolled in. In them, the students will be able to see assignments, comments, posts, and materials uploaded by the teacher.
Assignments
Single
Students are assigned assignments by the teacher in this group which they have to fill out by a certain deadline. They can attach any type of document, file or code from their own drive.
Cooperative
These assignments can also be tagged with cooperative tag meaning teachers can assign multiple people to one assignment where they have to work together on one shared project. All students can see their own teammates and open up a chat window to discuss the project.
Class documents/materials
Teachers may submit work papers or any other material that students may need to enchant their learning with. These can be document files, programs or any media file. Students can view them straight from the application.
Teacher chat
Students may direct message their teachers inside the class. They can ask for help or link any document from their drive/ the classes documents. They may also attach any kind of media file in that chat window
Quiz
Teachers can create quizzes that students may fill out. This test is server-side only and students may only know the answer upon finishing it. It can also be disabled by the teacher to prevent cheating
Question types
-
Text input
A basic text input field with a title. A character or word limit can also be set.
Rewarding:
Depends. The teacher may give the field a maximum achievable point that user can see when filling out. Then after the test is sent in teachers may grade accordingly. -
Basic select
A list of radio buttons are show which only one may be selected.
Rewarding:
One point -
Complex select
A list of checkboxes are show where multiple (or all) can be selected at once. The creator of the quiz may also create limits on the concurrent selections.
Rewarding:
As many points as many good answers. -
Pair match
An even number of cards are given that can either be an image or text. Or vise versa.
The user has to pair these cards. Order does not matter only if they match. Rewarding:
One point for each right selected pair.Rewarding:
As many points as many good answers.
-
Ordering
A list of text is show, the user has to order them accordingly.
Rewarding:
One point for every correctly ordered card.
-
File upload(s)
A field where users can select file(s) from their own drive and upload.
Rewarding:
Depends. The teacher may give the field a maximum achievable point that user can see when filling out. Then after the test is sent in teachers may grade accordingly.
Role
Roles like what discord has will be implemented too. Basically administrators can create roles and assign it to members of LearningPulse.
Roles will have permissions that provide users with abilities to do certain actions.
This will be achieved using the OpenId specification.
Examples:
learningpulse.administrator - Administrator privileges, overwrites all and has permission to do anything
learningpulse.classes.edit - Allows the role to edit any class.
learningpulse.quizes.view - Allows the role to view any quiz.
Drive
Each user, including teachers will have their own drive where they can upload any kind of file which they may share with other users on the platform. For the sake of less complications S3 storage will be used to build this part of the project.
This feature neatly integrates with the classroom and the quiz part of the program. Students can attach files to quizzes, classwork's from here.
It also allows for collaborative work where users can use fully fledged office suite's to edit their documents inside the browser.
Frontend
The frontend of the project will be built using React as its one of the most popular and stable Javascript frameworks out there. The frontend will be 50%/50% client and server side rendered using Next.js, not only because of this, but also because of it's high quality and optimization.
Themes
The frontend will allow users to select from a curated list of themes, making the application highly customizable, while keeping the ease-of-use at high priority, so our users can feel right at home. An example of the few themes LearningPulse will come with.
Wireframing
Wireframing involves creating a visual guide that represents the skeleton framework of our frontends.

Server
Backend
The server will be written in Java more precisely SpringBoot. It will be broken down to microservices for easy vertical scaling.
Vertical scaling also allow for redundancy and 99.99% uptime as services can be updated one by one, or updates can be pushed accordingly so that inactive nodes will get the release version and get prioritized. Then older nodes will eventually die off and get updated.
Authentication
Considering the nature of our project it is extremely important to make authentication as secure as possible, although it's debatable if it's as importand as at a Banking service for example. Still, security around auth is one of the most basic services.
And as such, for authentication Keycloak will be used to minimize security holes, as it's open-source, extensible, performant, and customizable.
Data storage
Our objective with data storage was to provide a safe, reliable, and well performing method of storing data, which is not only a must have, but is also one of the elementary requirements for any project - let it be small or big - with more complex data handling. Knowing this, PostgreSQL caught our eye, whlist not only meeting our demands for standards, but also having a strong reputation for itself.
We truly think that with this ORDBMS (object-relational database management system), we chose adaquate considering the competition of DBM systems.
For object storage S3 garage will be used considering it's geo-located property and ease of use.
Load balancing
With load balancing we wanted to go with something that had high reliability, stability, and also ease-of-use. That is exactly why Kubernetes caught our eye in distributing load along the nodes, meeting every standard point that we had in mind,.
Versioning
Semantic versioning will be used to version the software, making our life probably 10 times easier as software devs. We chose this, as it is one of the most popular and humanly readable versioning system out there.
ℹ️ Example:
Once someone commits a new update that causes older API's/features to break theMAJORtag has to be changed accordingly.
v1.2.43
commit - d71bb0e9d3 - refactor api
v2.0.0
Documentation
Documenting software is key to an open-source project like this. Each class, method and implementation will and have to be documented.
Server
Javadoc will be used to generate the documentation for each class and their inherited methods and so on.
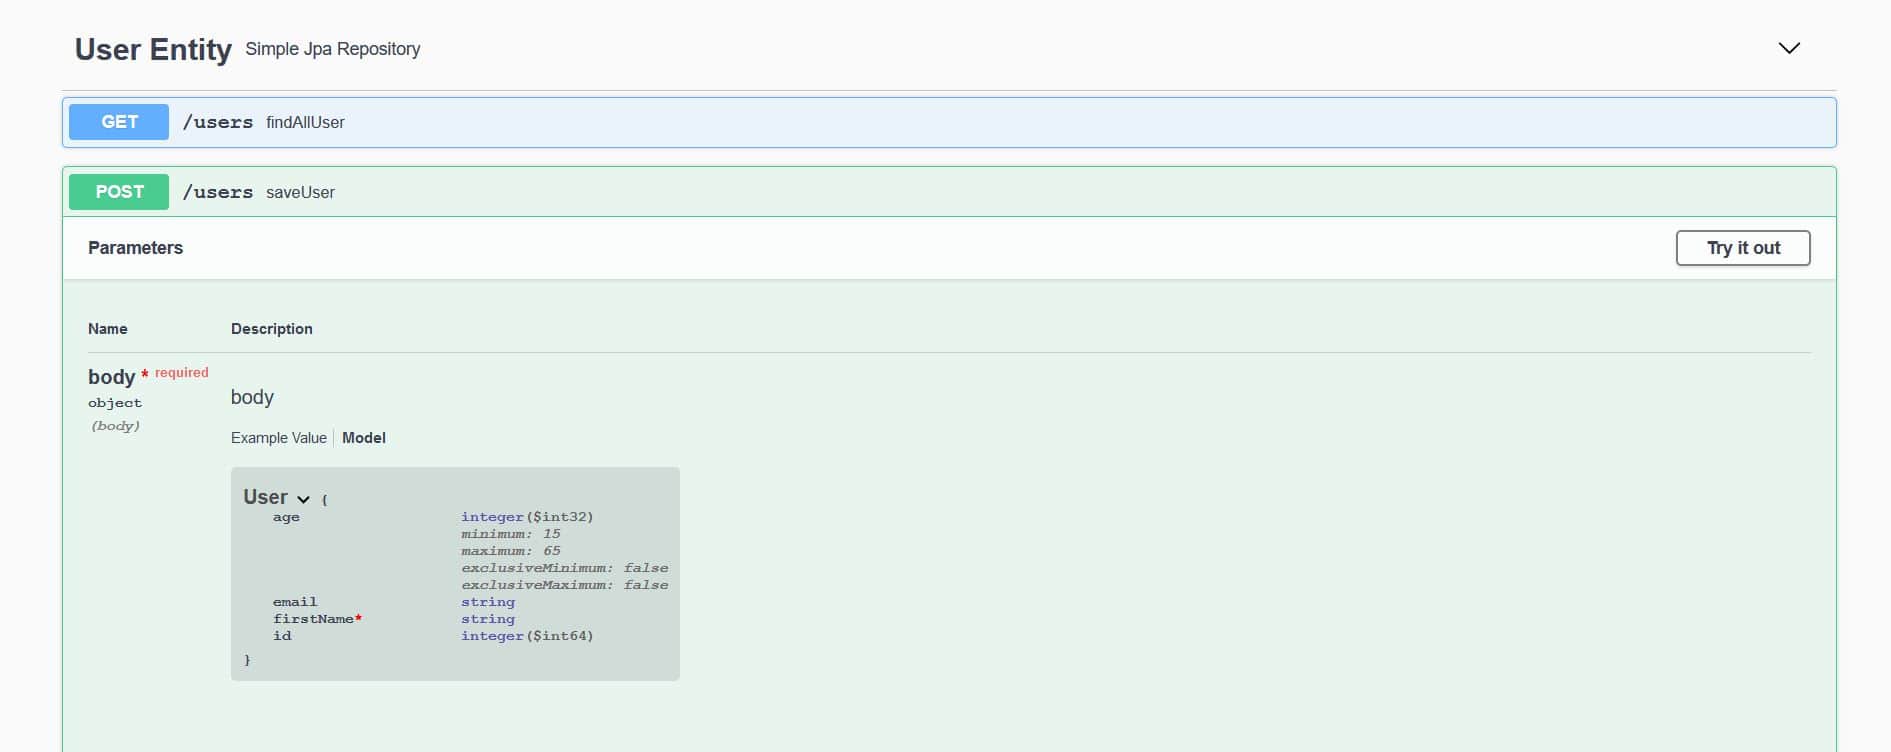
For the API part, thankfully SpringBoot has a swagger documentation plugin that can auto-generate it on the go based on beans.
Example
Here is a class that has requirements defined for its fields.
@Entity
public class User {
    //...

    @NotNull(message = "First Name cannot be null")
    private String firstName;

    @Min(value = 15, message = "Age should not be less than 15")
    @Max(value = 65, message = "Age should not be greater than 65")
    private int age;
}
Output
When the API docs is generated these requirement will carry over to the swagger ui where users can see the requirements.
Similar to the frontend, this is a way to describe docs for a function.
/**
* Returns an Image object that can then be painted on the screen.
* The url argument must specify an absolute <a href="#{@link}">{@link URL}</a>. The name
* argument is a specifier that is relative to the url argument.
* <p>
* This method always returns immediately, whether or not the
* image exists. When this applet attempts to draw the image on
* the screen, the data will be loaded. The graphics primitives
* that draw the image will incrementally paint on the screen.
*
* @param  url  an absolute URL giving the base location of the image
* @param  name the location of the image, relative to the url argument
* @return      the image at the specified URL
* @see         Image
*/
public Image getImage(URL url, String name) {
  try {
    return getImage(new URL(url, name));
  } catch (MalformedURLException e) {
    return null;
  }
}
Testing
For the testing we decided on JUnit, as it simply met our standards, making testing on quote: "programmer-friendly". It was designed to test Java and JVM. Also it is one of the most popular and better frameworks for testing Java.
public class UserServiceTests {

    @Test
    public void TestUserPermissions() {
        User user = new User();
        // testing done here
    }
}
Frontend
Documenting the frontend of the project can be quite tricky, making our already miserable life even more miserable (joke). We will be working hard on making sure that every important aspect of the frontend is well-documented, and written down.
For methods and classes, JSDoc for typescript is the perfect fit.
/**
 * @param {number}  number - The number we want to check if is prime
 * @returns {boolean} Return value
 */
function is_even(number): boolean {
  if (number % 2 == 0) {
    return true;
  }
  return false;
}
For user action descriptions and flow charts Mermaid has to be used.
We can describe actions that are then generated into SVGs, PNGs, or other formats. It also neatly integrates into Forgejo.
An example of a state description
Raw
stateDiagram-v2
    [*] --> Still
    Still --> [*]
    Still --> Moving
    Moving --> Still
    Moving --> Crash
    Crash --> [*]
Output
stateDiagram-v2
    [*] --> Still
    Still --> [*]
    Still --> Moving
    Moving --> Still
    Moving --> Crash
    Crash --> [*]
Testing
It is also important to test the Javascript part of the project. For that we decided on using Jest (jestjs) as it's easy and simple to use, as well as it's one of the most popular Javascript frameworks for testing the language. The framework is well-documented (just as we wish our project would be) and it also provides some extra statistics for the ones who need it.
Example:
- Define the test in
tests/test.ts
// tests/testClass.ts
function sum(a, b) {
  a + b;
}

test("adds 1 + 2 to equal 3", () => {
  expect(sum(1, 2)).toBe(3);
});
- Run test
npm test
Development
CI Continuous Integration
Continuous integration allows us to take development to the next with automated building.
Github forgejo actions will be used to compile a docker images of each service then uploaded to the image registry of our own forgejo instance. This can later co-op with CD to automatically deploy to our test servers and later even production.
flowchart LR
    A(Git push)
    A --> B(Build services)
    B --> C(Run tests)
CD Continuous Delivery
After images are built, they need to be deployed to some server for e2e and unit testing. Instead of us going thru all the servers and manually pulling the latest images, docker compose webhooks can be used to trigger the pull.
flowchart LR
    P[Push to master] -->
    A[Actions build images]
    A --> B[Actions issue a remote pull for containers]
Git Version control
Since developers will choose their own features they want to implement, creating a new branch for that feature, and developing there is a must! By default if any other features get implemented into the main developer branch,that feature will need to be pulled and merged into the other development branch.
After the feature is stable and working and tested, the owner of that feature will create a pull request and merge into the main branch.
For pull request to be pulled into the developer branch, at least two people in the project have to review the code and approve it. If the code is not fitting for a member an issue can be raised to fix x y part of the code. Then the request can be review once again
An example of this process:
gitGraph
    commit
    branch dev
    checkout dev
    branch user-service
    commit
    commit
    checkout dev
    merge user-service
    branch drive-service
    checkout drive-service
    commit
    commit
    checkout dev
    merge drive-service
    checkout user-service
    merge dev
    commit
    commit
    checkout dev
    merge user-service
    checkout main
    merge dev
Developer shells using nix
A root flake.nix is included with the project to ensure that all of our developers use the same version of java, nodejs and other miscellaneous development tools. Flakes also allow us to easily reproduce the same errors on every type of machine.
Staging
In this section the documentation will explain how the application will be built over its lifetime. As this is a massive project, developers need to think thru their decisions on choosing the features and technologies which the application will be built upon. Since LearningPulse will employ many features it's only one way to get started. And that is to start with the bear minimum to get the foundation laying.
Alpha
The alpha version of LearningPulse is basically the Minimum Viable Product.
Only certain, let's call them core features will be implemented.
These include the following: